Tools & Tips You'll Need
-
![]()
The Right Tools
You'll need a cordless drill and a hammer. It's always worth making sure any cordless tools are fully charged before you get started.
-
![]()
Keep The Packaging
Do not dispose of packaging until shutters are fitted and operating properly.
-
![]()
Use A Dust Sheet
Use a dust sheet in your work area to keep furniture and floors protected. It's often best to move or pack away any breakables or ornaments nearby.
-
![]()
Match The Boxes
Make sure number on the box containing the shutter panels matches the number on the frame box. Be careful not to open too many boxes and get them mixed up either.
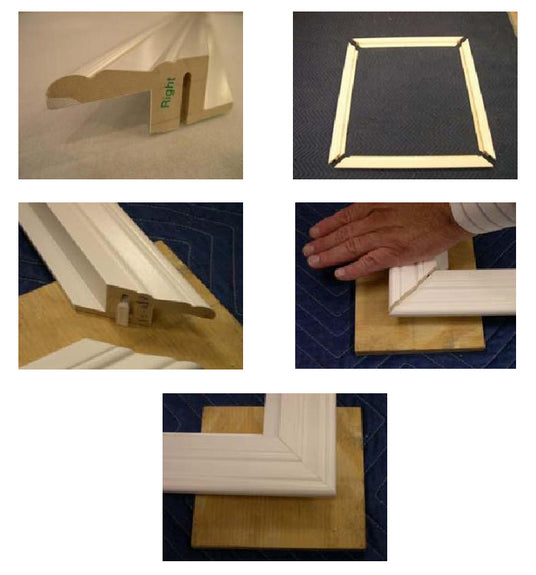
Assemble Frame
1. Carefully remove panels and frames from the packaging. Do not mix panels or frames from other windows. All frame parts are labelled (top, bottom, right, left).
2. Place all frames on the floor face up.
3. Position the left frame and the top frame onto a flat surface (small wood block is recommended to prevent damage to floor and to ensure a flush fit by the Hoffman Key) and line up the Hoffman key.
4. Place the Hoffman key rounded side up and push the top frame down onto the Hoffman key.
5. Ensure both frame surfaces are flush. Repeat step 4 for the remaining corners to complete your frame assembly.
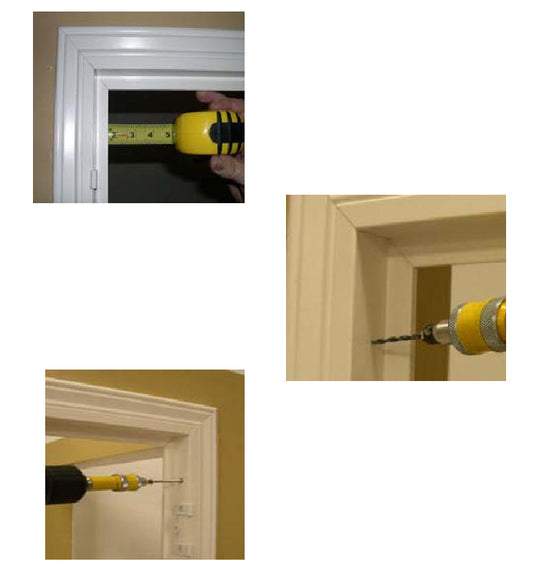
Fixing Frame
1.Lift the assembled frame into the window opening. Position the frame evenly in the opening using a tape measure and shims or packers. (If fixing into wood proceed to step 4)
2. If you are fixing into a masonry or plastered wall, drill through the frame at each corner using a 3 or 3.5mm drill bit. Make sure the drill bit has touched and marked the plaster behind the frame to indicate where you should drill the fixing holes.
3. Remove the frame, drill the wall with a suitable drill bit, insert your wall plugs and reposition the frame as it was before.
4. Once the frame is evenly spaced, secure with a screw in the top right hand corner only. The other parts of the frame will be secured later.
5. Once the left side is secured, level the frame in the window and secure the top left hand corner.
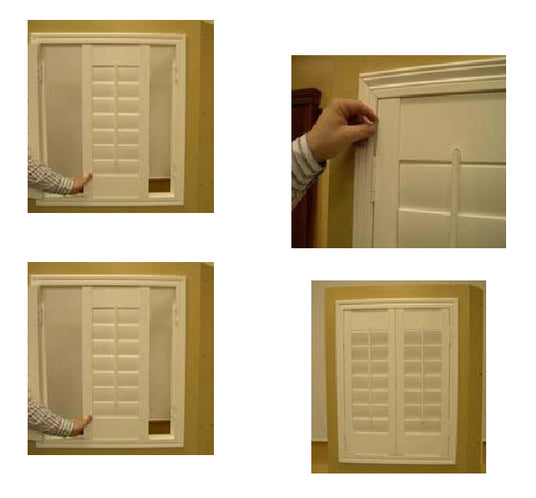
Hanging Panels
1.With the top left and right of the frame secured, place the left shutter panel(s) into the frame and slide it into place.
2. Insert hinge pins to connect both parts of the hinge.
3. Place the right shutter panel(s) into the frame and insert the hinge pins.
4. Both panels are now attached to the frame surround.

Final Adjustments
- Once the panels have been positioned and secured with the hinge pins, make sure they are level across the top and bottom. If the panels are not level, move the bottom of the frame left to right until panels line up evenly. Once the panels are level, secure the fixing screws in the bottom of the frame.
- Alternatively, to align panels evenly, slightly loosen the hinge screws on the leaf fixed to the shutter frame. The slot holes will allow you to raise or lower the shutter panel attached to the frame.
- Insert the final hinge locking screw once adjustments are completed.
That's it! Sit back and enjoy your Shutterplus Plantation Shutters.

